Wednesday, November 28, 2012

Leftover Turkey Soup


Leftover Turkey Soup


I took the turkey carcass, legs, wings, neck and covered with water in a big pot.  I boiled for about 1 hour.  I cooled it down a bit and scraped off all the turkey that was attached to the bones.  Actually the meat fell off the bones!  I strained the rest of the broth and used half of what I had (I got 16 cups of broth:  1/2 went to the soup, the other half will be frozen for a later time).

So the turkey went into the broth into a pot.
I added:

4 stalks of celery, chopped
1 onion, chopped
4 carrots, chopped
4 red potatoes cut up
2 bay leaves
2 teaspoons dried sage, crumbled
2 teaspoons crushed rosemary
salt & pepper to taste

The veggies are chopped into bite size pieces.  Add to the broth and turkey.  Bring to a boil and cook until veggies are tender.  About 10-15 minutes.

So tasty!  I served with sour dough roll.

Tuesday, October 23, 2012

Nutella Rolls With Cream Cheese Icing

Nutella Rolls with Cream Cheese Icing

Ingredients:
1 can Pillsbury Grand Biscuits
1 small jar Nutella
1 1/2 cups powdered sugar
4 oz cream cheese, softened
1 tsp vanilla

Instructions:
Preheat oven to 350
Roll each of the grand biscuits out into a flat circle with a rolling pin, coat with sugar on both sides.
Spread a couple of TBSP of Nutella onto each rolled out dough.
Roll up each dough (like a jelly-roll)
Cut each rolled up dough into 3 equal pieces.
Place 3 pieces, with the cut side up, into each muffin tin slot (sprayed with Pam)

Bake at 350 for about 15 minutes.  Once cooked, let cool in the muffin tin for 5 minutes, then remove and let finish cooling (or if you are like me and like them warm, then you won't have to wait long!)

For icing, beat softened cream cheese, vanilla and powdered sugar together until smooth.  Top each Nutella Roll with icing.


These disappeared fast!

Playing with Jewelry


I have been trying to learn jewelry making.  I made the turquoise necklace, bracelet and earrings, then made two more earrings.  The earring set on the right is still in pieces.

I am just learning and found that joining a kit of the month club was helpful.  What you see in the picture is 2 kits.  I actually have two more earring sets to make after finishing the one on the right.

To me it is a inexpensive way to learn.  The kit includes all of the things you need to complete some fun projects.  It is something that works for me.  The site for the kits also have videos set up for the projects, so you can see the items being made.

http://www.simplybeadskitclub.com/

Wednesday, October 3, 2012

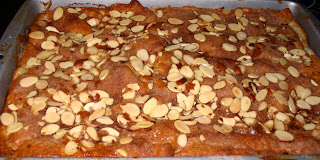
Sopapilla Cheesecake Dessert


My husband found this recipe.  He is a cheesecake lover!  Today I made it for him!

Sopapilla Cheesecake Dessert

Ingredients:

3 (8 ounce) packages cream cheese, softened
1 1/2 cups sugar
1 1/2 teaspoons vanilla
2 (8 ounce) cans crescent roll dough

1/2 cup melted butter
1/2 cup sugar
1 teaspoon ground cinnamon
1/4 cup sliced almonds

Directions:

Preheat oven to 350 degrees

Beat the cream cheese with 1 1/2 cups sugar and vanilla until smooth.  Unroll the cans of crescent roll dough.  Use a rolling pin to shape each piece into 9X13 inch rectangles.  Press one piece into the bottom of a 9X13 inch baking dish.  Evenly spread the cream cheese mixture onto the dough in the baking dish, then cover with the remaining pice of crescent dough.

Drizzle the melted butter evenly over the top of the cheesecake.  Stir the remaining 1/2 cup sugar and cinnamon in a small bowl, and sprinkle over the top, along with the almonds.

Bake until crescent dough has puffed and turned golden brown: about 45 minutes.  Cool completely in the pan before  cutting into 12 squares.


YUM!

Thursday, September 13, 2012

Evolution of my Crochet Jewelry Experiment


Learning to crochet jewelry is a learning process for sure.  I did some without beads, but decided to try to do with beads.

The first one I used #10 crochet thread and plastic beads.  Basically I crocheted 3 single crochets, added a bead, three single crochets and tied it together.  It came out long!

The second one was with some yellow stretchy cord and plastic beads.  Same pattern:  it came out about half the size as number one!

The third one is black stretchy cord, plastic beads and same pattern.  I obviously crocheted a little tighter:  actually I think I stretched the cord as I crocheted.

Number 4 is my first one with wire.  Interesting process:  I used glass beads.  I crocheted 3 chains, added 2 beads (one after the other: two chains), then only 2 chain stitches in between the two beads.  Ending with 3 chains.  I added a clasp to this one:  it would not fit over my head.

Each piece used 40 beads.  It is fun experimenting and I really like the way the crocheting with the beads look.  I still will be practicing and experimenting!

Tuesday, August 28, 2012

Envelopes from Magazine Pages


While going through my desk drawer I found a folder with an envelope template and some envelopes I had made a few years ago!  Forgot how fun they were!  I guess I will have to start making some more!

I had stickers to put on the center of the front of the envelope for addressing the envelopes.  Might put a smile on some mail person's face to see these envelopes for a change!

Monday, August 27, 2012

Shell and Arch Trim Crochet Necklace

Top is Arch trim necklace, Bottom is Shell trim
Another project done!  These crocheted chokers were a challenge.  I have never used such a small crochet hook and such thin thread in my life!  I was excited to complete this project.  I can still use some practice, especially on the tension, but I will be making more!  I am not afraid to try that lacy stuff anymore!

The button can be worn in the front middle, on the side or in the back!

I got this free pattern from the following link:


http://www.themakingspot.com/crochet/pattern/crochet-necklaces

These were created by Carol Meldrum and she is kind enough to provide the pattern for free!

I am the queen of tweaking and did a little tweaking in the arch trim necklace.  I don't know enough about writing out crochet patterns (it is like a foreign language) to say what I did, but I did tweak!

Sunday, August 26, 2012

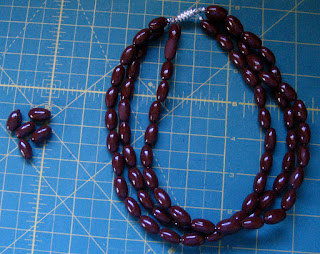
Coffee Bean Necklace


 This has been a fun project.  I started out by making the coffee bean beads out of Chocolate colored Fimo clay.  The beads were rolled in a bead roller, then baked.  When cooled, I put on a coat of Fimo gloss varnish.  After it was dried, I strung the beads in three strands attached to magnetic clasp.

It was a fun project and I love working with the clay and beading.  I need more practice with crimping the strings to the clasp!

This is a simple necklace and a good start to a new hobby!


Beef and Black Bean Taco Casserole


Beef and Black Bean Taco Casserole


1 lb lean ground beef
1 can black beans-drained and rinsed
1 jar salsa (16 oz)
1 package taco seasoning mix
2 1/2 cups coarsely broken tortilla chips
1 bell pepper, chopped
1/2 cup chopped red onion
2 Medium Tomatoes, chopped
1 cup shredded cheddar cheese
1/4 cup sliced olives
1 cup shredded fresh spinach leaves

Heat oven to 350

In a skillet, brown the beef then drain.  Stir in the black beans, salsa and taco seasoning mix.  reduce heat and heat to boiling, stirring occasionally.

Spray a 9X13 inch cake pan with olive oil.   Put 2 cups of the broken tortilla chips on the bottom of the pan.  Top evenly with the beef mixture.  Sprinkle with bell pepper, onions and 1 cup of the chopped tomato, the cheese and the olives.

Bake uncovered 20-30 minutes:  should be hot and bubbly and the cheese melted.  Top baked casserole with the spinach leaves, the rest of the tomato (about 1/2 cup), and remaining 1/2 cup of tortilla chips.

Sunday, August 19, 2012

Loop Fringe Crochet Choker

Loop Fringe Crochet Choker

This is my latest experiment.  It is a crocheted choker!  I saw the idea and discovered I had some  "grab-bag" yarn that I had bought a while ago that would work perfect.  The yarn is a mixed fiber with thick and thin parts (machine washable!).  I was pleased with the turn out.

I am going to try doing it again, but adding beads to the bottom loops.  It is a quick and fun project!

Here is the link for the inspiration of this project as well as free directions:

http://www.favecrafts.com/Accessories/Loop-Fringe-Crochet-Choker-from-Double-Stitch-Twins

Saturday, August 18, 2012

August Quilt Blocks

Ohio Star Block and Double Star Block

August quilt blocks are done!  I really like the Ohio Star Block.  The Double star block was a little more difficult:  lots of little pieces.  I should probably do a "do over" on it.  It just didn't come out as good as I would have liked.

The block of the month I am getting these blocks from is craftsy.com
They offer a lot of online courses.  This block of the month is a free course.

Friday, August 3, 2012

Chocolate Raspberry Cake

This cake is super fudgy,  decadent,  and rich!  It could be classified as sinful!


Chocolate Raspberry Cake

1 Cup + 2 TBSP cocoa powder
2 Cups + 2 TBSP Granulated Sugar
2 3/4 Sticks of Butter
1/2 Cup Seedless Raspberry Jam
4 Large Eggs
1 Cup Flour
1/4 tsp Salt
1 Tsp vanilla
Powdered Sugar

Preheat oven to 350 degrees F.  Butter and flour a 9" round cake pan or spring form pan.
In a large bowl, mix the cocoa and granulated sugar.
Melt butter and jam in a saucepan over low heat.  Pour over sugar and cocoa mixture and stir until well combined.
After cooling about 5 minutes, add one egg at a time to the mixture and blend until smooth.
Add flour, salt and vanilla and blend until combined.
Pour Batter into prepared pan.
Bake for 15 minutes.  Reduce heat to 325 and continue baking for another 45-60 minutes.  Toothpick inserted in the center comes out with moist crumbs.

Allow to cool in the pan for 1 hour.  Cut around edges and turn out unto a plate.  Cake is very moist and fudgy in the middle.

Let sit another hour, out of the pan and it will firm up and be easier to cut.

Warm 1/2 cup more jam and brush the cake.  Top with fresh raspberries, dust with powdered sugar.

Saturday, July 28, 2012

Spirited Cherries

Finished Product
   I had a surplus of sweet cherries.  I started paging through my            Ball Complete Book of Home Preserving book to get some ideas     of what to do with them.

   I came across a recipe for Spirited Fruits!

   Here is the recipe for Spirited Cherries

   1 cup granulated sugar
   2 cups water
   5 cups cherries with pits, washed and drained (use 7 1/2 cups if                     you prefer to pit them)
Sweet cherries    

 
   Per Jar:  1 TBSP rum, brandy or vodka
 
    Prepare canner, jars, and lids

    In a large stainless steel saucepan, over medium-high heat, combine sugar and water.  Bring to a boil, stirring to dissolve sugar.  Add the cherries, stirring constantly and return to a boil.  Reduce heat and boil gently for 5 minutes

Canning process
     Using a slotted spoon, pack cherries into hot jars to 1/2 inch of top of jar and add the spirit of or your choice.  Finish filling with the hot syrup.  Remove air bubbles and wipe the rims.  Center lid on jar, screw band down to finger tight.

     Place in canner and ensure the jars are completely covered with water.  Bring to boil and process 10 minutes.  Remove from canner.


Finished product
Ready to add the spirit

Wednesday, July 18, 2012

July Quilt Block of the Month

Traditional Dresden Plate Block and Modern Dresden Wheel Block

Yahoo!   Finished July before July was over!

These blocks scared me!  They look very complex and I was always in awe when I saw a quilt done with this pattern.

Ha!  This technique is so easy!  I could see doing a whole quilt using scrapes!  

I did zig-zag machine applique, but other options are blind stitch or straight stitch.  I have learned so much from this block of the month series.  It is at:


This course was a free block of the month course that includes a video demonstration along with patterns you can print out.  This course has really kept me going.  I love learning the cool techniques!  

Wednesday, July 11, 2012

June Quilt Blocks

Greek Cross block and Octagon Block
I am running a little late on getting my June quilt blocks done.  Better late than never!

These were pretty easy blocks!  The pattern is available at:

craftsy.com

I have been taking the free block of the month lessons offered on this site.  It is a fun sight to explore!

Tuesday, July 3, 2012

Happy Fourth of July!


Check out this link for a wonderful e-card.

http://www.jacquielawson.com/viewcard.asp?code=3559445041333&source=jlfb&cont=2

Hope everyone has a safe and sane Fourth of July!

Finished Project!


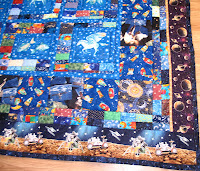
My four year old grandson came up to me a few months ago and said he had something serious to talk to me about.  What could be so serious with a four year old.  I kneeled down and asked what was on his mind:  he said he really needed me to make him a quilt!  How do you say no to that?

So we talked about what he would like on his quilt:  he wanted stars, planets, spaceships and astronauts.  

I had a blast shopping for the fabric.  There is no set pattern for this quilt, it was made as I went.  It has constellations, rocket ships, suns, moons, and astronauts.  A labor of love!

His birthday is July 4!  I was able to finish it in time for his birthday!  I can't wait to give it to him!

Now to think of a new project!


top left corner of quilt
top right corner of quilt


bottom right corner of quilt

bottom left corner of quilt


Hard to get a picture of the whole quilt!

Friday, June 1, 2012

Homemade Pizza


I love home made pizza.  This recipe has been in my family for a long time.  When my kids were growing up, we would divide the dough and everyone would make their own specialty pizza.  Tops can be anything!  This particular pizza has artichoke hearts, olives, spinach leaves, sausage, mushrooms, salami, shredded cheddar and Mozzarella cheese.

I do my dough in a bread machine using the dough cycle.  I love thick crust pizza, but you can also divide the dough to make two thin crust pizzas.

Pizza


Dough:

1 cup warm water
1 pkg dry yeast
1 TBSP Sugar
1 tsp salt
2 TBSP oil
3 cups flour

Mix all ingredients and knead to a soft dough.  Put in a bowl and cover with a towel and let rise 45 minutes to an hour.  Roll dough onto pan.  Poke holes with a fork and bake 15 minutes at 400 degrees

Sauce:

1 can tomato sauce
1/4 cup parmesan cheese
1/2 tsp salt
1/4 cup oil
dash of garlic powder
1/4 tsp pepper
1/2 tsp Italian seasoning (or a pinch of each:  basil, rosemary, parsley and oregano)

Mix together and spread sauce on baked pizza dough.

Top with cheese, salami, pepperoni, mushrooms and whatever else you like.

Bake 10-15 minuetes at 400 degrees

85 Degrees and Snowing?

The thermometer reads 85 degrees!  If you look out at the yard, it looks like it is covered in snow!  
Actually it is cottonwood trees shedding their cotton!  The pods are all open on the trees and when a gust of wind comes, it looks like a snow storm!  It even builds up into "snow" drifts!

Looks like snow on the ground!

Cottonwood Trees full of cotton

Looks like snow flakes

Build up of "snow"

Thursday, May 31, 2012

Spinach Harvest

Today I harvested spinach from the garden.  Guess what we are having for dinner!

This is about the third harvest of this size this year.  I noted that some of the spinach was starting to get tops, so I knew I had to harvest before they got bitter.

We have enjoyed spinach raw in salads, mixed with pasta and steamed.

This year, I am keeping track of not only what I plant and when, I am keeping track of what is harvested.  I had never kept track of the harvest part before, so this has been interesting.


Wednesday, May 30, 2012

Apple Chutney

Tonight we grilled the pork chop and the corn on the cob.  The finishing touch was the apple chutney.  This can be made fresh as the chops are grilling or a little ahead of time and kept warm.  The chutney is tart and tangy and compliments the pork well.


Apple Chutney with grilled pork chop and corn on the cob

Apple Chutney


1 Tablespoon Butter
5 cups cubed peeled apple (about 3 apples)
1/4 Cup cranberries (I used frozen and cut them)
3 Tablespoons brown sugar
3 Tablespoons cider vinegar
2 teaspoons ground ginger
1/4 teaspoon salt     
1/4 teaspoon dry mustard                                                                                   
1/8 teaspoon ground allspice

Melt butter in a nonstick skillet over medium-high heat.  Add apple and saute 4 minutes or until lightly browned.  Add the rest of the ingredients, bring to a boil.  Reduce heat and simmer 8 minutes or until apples are tender.  Stir occasionally.
Saturday, May 26, 2012

Super Nachos

Super Nachos

1 Lb Hamburger
1 Package Taco Seasoning Mix
1 Can Refried Beans
1/4 Cup Chopped Onions
1 Cup Shredded Cheese
16 oz Sour Cream
8 Oz Guacamole
1 Small Can Sliced Black Olives

Brown the hamburger and follow the directions on the taco seasoning mix to create a taco meat.
Spread the refried beans on a plate.  Layer as listed:
Taco seasoned hamburger, onion and cheese.

Put in microwave for 2 minutes:  enough to warm and melt the cheese.

Add the sour cream, then the guacamole and top with olives.

Dig in using corn chips.


This is a basic recipe:  You can add different items:  like salsa, green chiles, sliced avocados, or guacamole dip.  Use your imagination.  

Friday, May 25, 2012

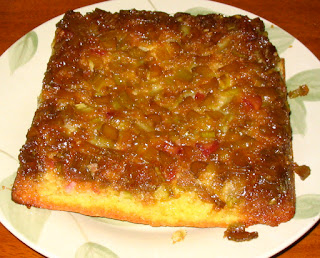
Rhubarb Upside Down Cake

Rhubarb Upside Down Cake

2 Cups Fresh Rhubarb, diced
2 Tablespoons Butter
3/4 Cup Brown Sugar
3 Eggs
1 1/2 Cups Sugar
1 Teaspoon Baking Powder
1 1/2 Cups Flour
1/2 Cup Milk

Wash and finely dice rhubarb.  Set aside.  Melt butter in 8X8 inch square pan.  Add brown sugar and spread evenly and add the rhubarb.  Beat the eggs with the sugar.  Slowly add flour and baking powder and milk.   Pour over the rhubarb.  Bake 350 degrees F for 45 minutes.  Remove from pan at once. 

Tuesday, May 22, 2012

May Block of the Month

Modern Log Cabin Block and Wonky 5-Sided Log Cabin Block


Here are my May quilt blocks!  I really liked the free form style of this technique!  Basically scrapping pieces together and doing the final 12 1/2 inch block cuts.

This technique would be fun to use on a whole quilt.  Each block would come out unique!

This is the block of the month through www.craftsy.com
This particular class is free.

Thursday, April 19, 2012

Strawberries!

I got 20 strawberry plants planted.

At the recommendation of Flower Tree Nursery

http://www.flowertreenursery.com/

I added some cottonseed meal to the soil before putting in the plants.  The strawberries are planted in a tiered planter with netting to keep birds out!

Last year, plants did not get planted until June:  too late for here!  Although I did get a couple of strawberries, the heat burned the plants out.

This year the plants are out in April.  I plan on getting shade cloth to put over the netting when the heat comes in June!

Putting the straw on for mulch is new this year also.  This should keep moisture in the ground!

I can taste those strawberries already!

One thing I love about the local nurseries is the personalized service!  The people at these places know their stuff and know the local needs.  Much better than the box stores!

Shop Local!


Wednesday, April 18, 2012

Broody Hen


This little hen became broody the last couple of weeks.  When the chicks were put outside next to the big coop, she would come to the gate and watch the chicks.  Today I let everyone out to free range:  big chickens and chicks intermingled with no problems.  When it was time for the chickens to go back to the coop, this little hen went in with the chicks.  So far so good.

Monday, April 16, 2012

April Block of the Month blocks

Hexi Stripe and Hexi Tree blocks


The Craftsy.com Block of the Month project for April was very challenging.  There is a lot of hand work on these two blocks!  The theme was using hexagons.

The directions were for the Hexi Stripe block and a Sunny with the chance of Hex, but I changed it out and tried to create a tree on a lake!  Looking at the picture it looks like an Easter tree!  Oh well.

The best thing about the block of the month is learning and trying new techniques.  The block of the month is a free class, but Craftsy offers a lot of other classes.  Check them out!


www.craftsy.com


As I was taking this picture, the cat ran into the picture.  The delay of the picture taking process makes it look like a ghost cat!  Nothing better than a cat approved quilt!

Thursday, April 12, 2012

Clam Spaghetti


The first time I had a clam spaghetti was on a back packing trip.  We carried in a couple of cans of clams, some white wine and spaghetti noodles.  After a long day of hiking, clam spaghetti was the best thing I had ever eaten on a back pack trip!

This version is more for in the kitchen!  It is a complete meal as is, but a side salad and some buttered french bread puts it over the top!

Clam Spaghetti

Total time: 21 minutes
Makes 6 servings

4 slices of bacon, diced
2 tablespoons olive oil
4 cloves garlic, sliced
1 bag (9 ounces) baby spinach
1 pound thin spaghetti (I used a whole wheat thin spaghetti)
2 cans (6.5 ounces each) minced clams in juice, undrained
1/4 teaspoon red pepper flakes
juice of 1/2 lemon

1) Bring a large pot of lightly salted water to boiling.    Heat bacon in a large skillet over medium heat.  Cook 8 minutes, until crisp.  Remove to paper towels with a slotted spoon.

2)  Add olive oil and garlic to the skillet.  Cook 2 minutes, stirring so the garlic doesn't burn.  Stir in the spinach and cook 3 minutes.   Stir in the clams with their juice and pepper flakes into the skillet with the spinach.  Cook 3 minutes.

3)  Meanwhile, add spaghetti to boiling water.  Cook 6 minutes and drain.  Return noodles to the pot.

4)  Add spinach mixture to the pasta along with the lemon juice and the cooked bacon.  Toss to combine.

Wednesday, April 11, 2012

Carolina Pulled-Pork Sandwiches

Carolina Pulled-Pork Sandwiches


So good!  Cooks in a slow cooker, filling the house with a wonderful smell all day!

Makes:  8 servings.  Prep:  15 minutes
Slow Cook: HIGH for 6 hours, LOW for 8 hours


Pork:
1 boneless pork shoulder roast or picnic roast, skin removed, trimmed (about 3 1/2 pounds)
1 teaspoon salt
1 teaspoon paprika
2 Tablespoons Olive Oil

Sauce:
1 Tablespoon olive oil
1 small onion, diced
1 cup apple cider vinegar
3/4 cup ketchup
1/3 cup packed light-brown sugar
2 Tablespoons spicy brown mustard

8 seedless sandwich buns

1)  Pork:  Rub the pork all over with the salt and paprika.  Heat oil in a large nonstick skillet over medium high heat.  Brown pork on all sides, about 12 minutes.

2)  Sauce:  Heat oil in a large saucepan over medium heat.  Add onion and cook 5 minutes.  Stir in vinegar, ketchup, brown sugar and mustard.  Bring to a boil, then reduce heat and simmer 5 minutes.

3)  Transfer pork to the slow cooker; add sauce.  Cover and cook on HIGH for 6 hours or LOW for 8 hours.

4)  Meanwhile, prepare Coleslaw.


5)  Remove pork from slow cooker and allow to cool slightly.  With 2 forks, shred the meat, discarding fat.  Stir pulled pork into sauce in the cooker.  Divide evenly among sandwich buns.  Top with coleslaw or have the slaw on the side.  Also had chips on the side!


Coleslaw


In a medium bowl, whisk together 3/4 cup mayonnaise, 3 Tablespoons Apple Cider Vinegar, 1 Tablespoon sugar, 1/4 teaspoon each:  celery salt and black pepper.  Stir in 1 lb bag of shredded coleslaw mix.  Refrigerate until serving.

Tuesday, March 27, 2012

Block of the Month for March

String Block and Broken Spider Web Block
Finally I got March's blocks done!  Definitely colorful and a couple of new techniques learned.

The block of the month class is offered through http://www.craftsy.com/    
This particular class is free.  They offer a lot of fun classes.

I have been getting my fabric at The Uncommon Thread:  a local quilt shop.  Here is their facebook page:  http://www.facebook.com/pages/UnCommon-Thread-Online/131474643558356

Wednesday, March 14, 2012

Crock Pot Corned Beef and Cabbage


Picked up some corned beef from Heck's Meat Company in Fallon, NV  (https://www.facebook.com/HecksMeatCompany) today.  Had Cook it up today!  It is so good!  Something to be said for a real butcher shop!  It had to be ordered ahead of time so that it could process.  It came out so good!  I think I already said that!  But can't say it enough!

Crock Pot Corned Beef and Cabbage

1 1/2 pounds peeled baby carrots
2 1/2 pounds red potatoes, quartered
1 onion, peeled and cut into bite size pieces
4 cups water
4 pounds corned beef brisket with spice packet
6 ounces of beer
head of cabbage cut into wedges

Place the carrots, potatoes and onion into the bottom of a slow cooker.  Pour in the water and place the brisket on top of the vegetables.  Pour the beer over the brisket.  Sprinkle on the spices from the packed, cover and set the cooker on high.  Cook for 6 hours (longer if cooking on low)

I steam the cabbage separately until fork tender.  When I take the brisket out to slice, I put the cabbage in the crock pot to soak up some of the juice.

Wednesday, March 7, 2012

Root Beer Float Cookies

These cookies are really good!  The frosting recipe calls for more root beer extract, but as for me, I prefer a vanilla frosting.  That way the cookies taste like root beer with vanilla "ice cream" on top!


Root Beer Float Cookies

Ingredients:
1 Cup Sugar
1 Cup Brown Sugar, packed
1 Cup Butter, softened
1/2 Cup Buttermilk
1 TBSP Root Beer Extract
1 tsp Vanilla
4 Cups Flour
1 tsp Baking Soda
1/4 tsp salt

Frosting:
3 Cups Powdered Sugar
3 Tablespoons Half-and-Half
2 Tablespoons Butter, softened
1 Tablespoon Rood Beer Extract

Directions:
Preheat oven to 375.  Lightly grease cookie sheets.

In a bowl combine sugar, brown sugar, 1 cup butter, buttermilk, eggs, root beer extract and vanilla
Beat until well blended.  Add flour, baking soda and salt.  Blend until dough forms.
Drop by heaping teaspoonful 2 inches apart on cookie sheet.
Bake 10-12 minutes or until set.  Cool completely.

In a mixing bowl combine frosting ingredients, beat at low speed until smooth.  Spread frosting evenly over the cooled cookies.  Let dry completely before storing in container.

Makes 5 dozen cookies.

Sunday, March 4, 2012

What Happens When a Rooster Attacks?

You make Crock Pot Chicken Pot Pie!


Crock Pot Chicken Pot Pie (before the biscuit topping)

1/3 Cup Flour
1 3/4 tsp Poultry Seasoning 
1 3/4 tsp Dried Thyme
1/2 tsp salt
1/4 tsp Black Pepper
2 pounds boneless, Skinless Chicken, cut into 1 inch pieces 
2 TPBS Vegetable Oil
2 Large Carrots, peeled and cut into half-moons
2 Celery Ribs, sliced
2 Red-Skin Potatoes, cubed and cut into 1/2 inch pieces 
1 large Portabella Mushroom, cut into cubes
1 Large Onion, chopped
1 can Chicken Broth

2 1/4 Cups biscuit mix
2/3 Cup milk

Combine flour, poultry seasoning, 1 tsp of the thyme, salt and pepper in a a large resealable bag.  Add Chicken pieces to bag and toss to coat.

Heat 1 TBSP oil in a large nonstick skillet over medium-high heat. Add the chicken and cook 5 minutes, stirring occasionally until browned:  place in the crock pot.

Add remaining 1 TBSP of oil in the skillet and stir in carrots, celery, potatoes, mushrooms and onion.  Cook, stirring often for 5 minutes.  Sprinkle in any remaining flour mixture left from the chicken.  Cook another minute.  Add broth to skillet and bring to a boil.  Pour into the crock pot.

Cook HIGH for 4 hours or on LOW for 7 hours.

When there is one hour left of cooking:  stir the biscuit mix, milk and remaining 3/4 tsp thyme.  Drop biscuit mix by the tablespoonful over the top of the crock pot mixture.  Cover the crock pot bowl with a cotton dish towel and place the lid on top.  Continue cooking until biscuits are cooked through.
       
Biscuit topping added